Wednesday, December 31, 2008

Yikes! The world as I knew it came to an end…


…Or my world anyway!

Wow! I’ll have to say being with out internet and computer puts a halt to life as we know it. I allowed a friend to use my laptop and Walla, Trojans and viruses galore! I was without both for almost 2 weeks. Then I have been in the process of moving since the upheaval. Hence, no posts for quite sometime. So sorry for the delay. I learned a huge lesson…never let anyone use your computer or at least the one that your life or all your artwork on it. As well as, have some posts prewritten and ready to publish. That way you don’t feel overwhelmed with everything and can keep in touch with everyone. I’ve learned my lessons and ready to start the New Year off right. So look out here I come, ready for a great year of blogging!

Well, I hope everyone enjoyed my “how to stretch a canvas” series. If anyone has any ideas or tips, please let me know. I would love to hear your ideas.

I recently had a 1 night art show with 4 other artists called Art Above the City. It was wonderful, very educational and helpful. I decided along time ago not to leave it up to someone else to decide my future. While I love the idea and the fast track of a sponsor or gallery to take one under their wing and help them along, it doesn’t always work that way or not in the time I would like anyway. I have found that by putting on your own art shows and putting it out there, you are paving your own way. One never knows who will show up or what friend will bring that someone who will either love and BUY your art or be the one to help push your career in the perfect direction.

I have put on numerous art shows which has gotten me into local magazines, local galleries, a great art friend network, and brought people to me that otherwise I would not have met. It is hard work but, very beneficial. Over the next few weeks, I will be putting together some tips to starting your own art shows and events.

Remember…Whether you think you can or you can’t, you are always right!

Being an artist isn’t easy, but if you do all you can for your art career, you WILL succeed! Enjoy the process!

Happy New Year to everyone!


Like this & want more?
Subscribe via email or Subscribe in a reader

Tuesday, November 18, 2008

You think you are ready to stretch? I'm ready to show you!

You’re almost finished!

Phase 3: The Canvas

Tools needed: Canvas, scissors, razor blade, red marker, Canvas Stretching Pliers, Hammer, staple gun with staples, tape measure, and flat-head screw-driver

Cutting the Canvas

First you will want to decide if you want a gallery wrap or not. A gallery wrap is where the canvas stretches around to the back and stapled. The other way is where the canvas is just stretch to the sides and stapled. This way is harder to stretch as the wood frame cannot be laid flat on the floor and canvas pulled around. The gallery wrap is much easier as you can use the back to help brace while you are stretching and attaching the canvas. I find the gallery wrap is not only be easier but, looks much more professional and finished out. That’s just my opinion though. Do what works best for you and your art!

1) Now that you have decided whether you like gallery wrap or wrapped just to the sides. Roll the canvas out enough on the floor to be able to measure and cut it. Remember to always add a little extra canvas to be for sure. If you chose the gallery wrap, you will need extra to go around to the back and attach. EXAMPLE: If your wood frame is 24 inches and the wood used is 1.5 inches, you will need to cut the canvas to at least 28-29 inches. Beginners add a little canvas. If you choose the side wrap, you won’t need as much, because you just need enough to go along the sides to attach.
2) Now that the canvas is cut, place the canvas (side you will be painting on) front side to the floor and position the wood frame evenly on top of the canvas. It is best to measure around so that it is pretty much the same amount of canvas on all sides. TIP* Look at the wood frame and make sure the best side with no holes, knots, or blemishes is face down. You always want the best side touching the canvas. The side that you will be painting should be as perfect as possible.

3) Take your Canvas Stretching Pliers, hammer, and staple gun. Start in the middle of 1 side of the frame and attach the canvas to the wood. Put at least 2-3 staples (or whatever you are using to attach the 2 together) in the center. Then, go to the opposite side and do the same. Here you will need to use the pliers to pull it tight prior to attaching. Next do the other 2 sides using the pliers from now on through the process.
4) Once you have continued to work your way out to the edges, you are now ready to do the corners. TIP* Leave enough room that is not stapled down to do the corners properly. You will want to have to opposite edges that go under the other 2 opposite edges.

5) Go to the edges that will go under the other two and continue to staple them all the way to the end. TIP* If there is too much canvas once you get to the end, you can cut some of it. It will fold better for the corners.

6) Fold the end of the canvas down the side, then fold it over and make the crease as close to the edge without going past. When you are ready to staple it down, take the pliers and pull it as tight as possible before stapling it down. This makes for a much neater corner. If you are having difficulty with this, think of wrapping a present, and do the same. It may be awkward at first and not be exact, however; be patient with yourself and keep working at it. It will get easier and look better the more you do it.

7) Continue to the other side, and the other 2 ends, and WALA you have a completed stretched canvas that you did for a fraction of the cost!


I think I have covered everything, if I have left out anything or you have a different and easier way, please let me know. Any ideas on the topic, I would love to hear them.
I hope this will inspire you creatively as much as it has helped me. I love stretching my own canvases. I find it very meditative and motivating. As always...Enjoy the Process!

Like what you read and want more of the same?
Subscribe via email or Subscribe in a reader

If you just popped in on this blog, you might enjoy the entire series on canvas stretching.

Tuesday, November 11, 2008

What will your frame look like finished?

Ok, the pictures are in. I hope this will help you picture what I am explaining! Here we go!

Phase 2: Building the Frame
Tools Needed: Wood, wood glue, hammer, nails, sand paper, tape measure, red marker

Positioning the wood

What will it look like finished?
Ok, the first step in the phase is placing the wood pieces in the way you want the frame to look.

1. The best way to do this is to find a large area up against a very solid wall and lay the wood pieces in the dimensions and shape of the end product. Place the pieces with the best sides of the wood all facing the same direction. That will be the side that faces the canvas. Tip* Remember to always measure the frame prior to nailing it together. That way you will be sure to nail it together in the dimensions you were making.

2. Put a small amount of wood glue on the piece of wood that is being nailed into the other piece of wood.

3. Take 2 nails and hammer them into the pieces of wood with the glue on it. It is best to nail in a slight diagonal manner. Tip* Make sure the wood stays in a square position and is level & flat throughout the process. I will usually put 1 foot on each piece of wood to help keep it from moving while I hammer. Hammer both sides together, then move it to the back and do the other 2 sides.

4. Once the 4 pieces are nailed together, put in the brace. Measure the side and place the brace or braces (depending on size of canvas) in the middle. EXAMPLE: For a 24inch frame, brace would be at 12inches. For a 60inch canvas, the 2 braces would be at 20inch spaces.

5. Allow the wood glue to dry for 24 hours, then take sand paper and smooth out the corners, seems, and edges.

You’re almost finished! The last step is the canvas. Until next time...Enjoy the process!

Like what you read, what more?
Subscribe via email or

Tuesday, November 4, 2008

Tips to picking out your canvas

What width do I purchase the rolled canvas, and from where do I purchase the canvas? Questions that are going through your head, I bet. It can be confusing and overwhelming if you don't know where to begin. Step three in the canvas stretching process is your canvas choice.

As far as the choice of canvas goes, you have either primed or unprimed, as well as, cotton or linen. Primed means that gesso has already been applied. Unprimed means raw canvas with nothing on it. Depending on your project, you’ll need to determine what works best for you. I know of artists that never prime their canvas, however; they rarely use paint. Paint is liquid and will bleed through that is why it needs to be primed prior. I recommend buying a small piece of both primed and unprimed canvas and stretching both and see what you like best. Remember though, that the unprimed will need to be gessoed prior to the actual painting. That is an added step and cost. Once you have chosen which style you prefer then decide whether you like cotton or linen best. I find that cotton works best for me and is always reasonably priced.


Canvas comes in many widths from approximately 52 inches to 144 inches wide and in lengths from 6 yards to 100 yards. The width usually depends on the size of the piece you are going to paint. The bigger you go, the wider it needs to be. I suggest not going too big on your first few till you get the hang of the process. I would recommend going a little smaller in length till you decide what you like work with the best. You don’t want to be stuck with 50 yards on canvas that is hard to stretch.


Now that you have decided on the canvas selection, it is best to buy it in bulk. It is less costly and you will have more freedom. Research your local art shops as they frequently have sales and that is a great opportunity to stock up. I usually purchase it online and have it shipped. For me, it is the most cost effective with the choice and width I prefer. I purchase from Blick Art Materials for all my canvas needs. Dick Blick frequently has sales and a great selection of canvas both primed and unprimed cotton and linen in various widths. It may take time, but you will find what works best for you. Enjoy the process!

Fantastic! Now that you have made all your choices, you are ready to begin the next phase in this process.

Like what you read, what more?

If you just came to this blog, you might like to read other posts in the series.

Tuesday, October 28, 2008

What are the Type of Nails to Use When Stretching Your Own Canvas?

When I am stretching my own canvases, the right nails makes the job so much easier and makes the canvas look more professional. When you walk into the hardware store and see this in front of you, I bet you think "Holy Smokes! Which do I choose? Well, here are a few quick tips for you, when picking out the best nails for stretching your own canvas.


Picking out your nails & staples


The second step in How to Stretch Your own Canvas is the choice of the nails you plan to use for the frame, braces, and stretching the canvas to the frame. Depending on the size of the wood you pick for the frame, the nails will vary. The wider you go the longer the nails need to be. The same goes for the braces. The canvas however, uses completely different nails. Usually I find that a staple gun and staples work best.

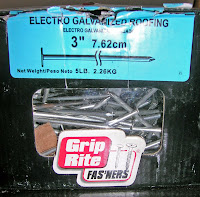
1) For the Frame: Frame nails need a larger head which is easier to hit when hammering the wood together. A good size that works well for me is 3 inch Electro Galvanized Roofing nails and they come in various lengths depending on the wood size you are using. Try different nails and sizes and see what works best for your canvas.


2) For the Brace: Brace nails are usually a little smaller with a smaller head as they have a smaller area to go through. The best nail I have found for this is the 3 inch Bright Finish nails. These also come in different lengths depending on your wood. Once more, experiment with different nails and see what works best for you and your canvas.


3) For the Canvas: When attaching the canvas to the frame, depending on the look you want to achieve, there are various nails and staples that work great. You can use a staple gun that uses either industrial staples or nails or small nails. For me, I have found that the use of a staple gun and staples works best and can hold the canvas much tighter than staple gun nails or traditional nails, as well as, easier to work with. The best rule of thumb though is to see what works and feels best for you.


Now that you have your wood and nails chosen, the next step it choosing the canvas you like best. That's coming up next! Until then...Enjoy the Process!

Want to see more about this topic? click here


Tuesday, October 21, 2008

What's up with me, you ask? How did I learn to stretch canvas?

I was talking with my friend the other day and she asked some questions regarding the blog and how I learned to stretch my own canvases and why I decided to start doing it. So I thought I would take a small break from my canvas stretching series to share the story.

I have been painting and sculpting for many years (too many to tell;-). I always wanted to learn to stretch canvas, but was lazy and needed to see someone do it first. You see, I am a visual person (hence the artist) and once I see something done, it's much easier to be able to do it. Last year I decided to get back to my joy and paint and sculpt full time. I always wanted to go really large, but just hadn't done it yet. Originally, I had a friend that I was going to paint a piece for (kind of a 'thank you' piece) and he wanted it very big. So that was my excuse to go BIG! I went to the store to pick up a canvas and was shocked at the price of stretched canvas. Yicks! It was around $120. Luckily there was a 50% off sale. Now I was looking at $60. I started looking around and a local art supply store is always running a 50% off sale. Theirs canvas was $65. Since I wasn't paying for this one, no biggie, but the next one would be a biggie. I went ahead and bought the canvas and realized if I wanted to do big pieces, I needed to learn how to stretch my own.

I was hanging out with an artist friend, Jesse Cole, who stretched his own. The universe always help ya out when you need it, I find. I asked if he would teach me, and with a few improvements, WALA here we are! I find it very cathartic and now always have around 10 blank canvases to paint on. I love it and each canvas costs me less than $10, even the big ones. How cool is that? My hope is that you will enjoy stretching your own as much as I do. I find that my art is richer now than when I just went to the store, picked up the cheapest canvas I could find, and plunked my money down for it. Here's to the process, Enjoy!!

Like this and want to read more,

Subscribe to Galleria Lisa News

Tuesday, October 14, 2008

Picking Out the Perfect Wood...for your canvas!

As I continue with the "How to Stretch a Canvas Series", Phase 1 is one of the most important stages of the precess. I have broken it down into 4 Simple Steps to Picking Out the Wood. These steps are all you will need for stretching your first canvas and hopefully many more after.


Phase 1: Getting the right materials
Tools Needed: Pen and paper, tape measure, wood, various nails & staples, red marker

Picking out your Wood!


The first step to stretching your on canvases is deciding where you are going to buy your wood as well as the type and size of wood you are going to use.


1) First I decide how many frames I am going to make, get the measurements of each piece. EXAMPLE: If I am making a 2 foot by 2 foot canvas, I will need 4 pieces and 1 brace. I will need 2 pieces that measure 24inches and 2 pieces that measure 21inches (remember the wood is 1.5inches and 21+ 1.5+1.5=24). The brace needs to be 21inches as well. TIP Keep in mind that most of the pieces of wood you are going to buy are 96inches long, so plan each piece of wood to get the most out of it!

2) I have found that Home Depot has a great selection of 2x2s. (That is what I use.) Keep in mind that the 2x2 is really 1.5x1.5 and usually 96 inches long and all other sizes with not measure to what they say. Always measure your wood to be sure. Depending on your style and the size of the piece will determine the wood you use. I have found for all intense and purposes the 2x2s look the best after it is stretched and painted. It is thick for a gallery wrap, but not too wide or heavy. Choose what works best for you!

3) Once you pick the type of wood and size you plan to use, then you need to pick the straightest and most blemish free pieces you can find. If they are warped your canvas will suffer. I have spent as much as 3 hours picking out my wood. Once I find what I think is a fairly straight piece, I will eyeball it (put 1 end on the ground and your eye up to the other and look down it to check for bends, warped areas, and knots in the wood). I then, put in on the ground and roll it on the floor to see how it rolls from side to side. Check for rises in the piece or it not lying solid. Take your marker and tape measure and mark the wood where it will be cut. Remember if it is not as straight as possible it won’t hang correctly on the wall!


4) Always look at each piece after it is cut and make sure it is the correct measurement you asked for. TIP If you have the employee cut 2 pieces at the same time, then they will match. You want to get as close as possible to the original dimensions. Don’t be afraid to have the employee fix the piece or correct the mistake if it happens, but don’t be too precise. They do the best they can and a little smile and a “thank you so much” go a long way!


Once you have chosen the wood and had it cut, you are ready for the next step. Choosing your nails will follow. Stayed tuned.............


Until then, Enjoy the process!


Want to read more like this

Subscribe to Galleria Lisa News

Tuesday, October 7, 2008

16 Tools You Need to Stretch Your Own Canvas!

Have you ever wondered "How To Stretch Your Own Canvas" ? Well I'm gonna tell ya in the coming weeks! It starts with the right tools and supplies. Take a little time, go to a couple of local art supply stores in your area and do some research online. Check out Blick Art Materials online, they are great for comparison shopping and getting info that you need, as well as a great selection of art supplies, descriptions, and great pricing. I use them a lot. Once you've done some research on the perfect tools for you, start getting the tools together. My recommendation is to get good quality tools and supplies, as you will be using them for the rest of your art career. The quality of your tools will reflect in the quality of your stretched canvases and the quality of your art itself.

All the tools needed to stretch your own canvas: Wood (see Phase 1-Wood), Various Nails (see Phase 1-Nails/Staples), Staple Gun, Staples (see Phase 1-Nails/Staples), Canvas Stretching Pliers, Hammer, Tape Measure, Wood Glue, Canvas (see Phase 1-Canvas), Razor Blade, Scissors, Red Marker, Sand Paper, Flat-Head Screw-Driver, pen and paper.

As I continue this "How To Stretch Your Own Canvas" series, I will go through every step you will need to perfect this process. Stay posted in the weeks to come as I teach you step by step "How To Stretch Your Own Canvas". Enjoy the process!
If you wanna see more like this Subscribe in a reader

Saturday, September 20, 2008

Ok Guys!!! I Picked a Steep Hill to Climb.


I started working on my "How to stretch a canvas" blog. I though it would be a quick series with a couple of blogs. Holy smokes!! Was I ever wrong. I've been working on it for over a week now and I am only up to the making your frame part. I guess I have taken for granted the difficulty and or ease in stretching my own canvases. It is coming along nicely, but slowly. So it will take a bit longer to complete the entire blog series. Be patient please because it will be worth the wait as I am starting it from the prospective of having no clue and I am including tips, tricks, and great places with fantastic bargains along the way! I am going out of town on business for the next couple of weeks, so it will take longer to get the entire step by step process of canvas stretching completed. I will continue to work and publish the blogs, but they will be somewhat sporadic until I return. Any questions along the way, please ask. I really love stretching my own canvases and am happy to share all my knowledge. I find that it gives me much more freedom to create, because I have no limits when I make the canvas myself. I now work quite large and don't think I would have taken the plunge had I just purchased the canvases. I hope you too will find it as rewarding as I do. Until next time...Enjoy the process
If you like this...

Monday, September 15, 2008

The Drizzle Dwindled-The Evening Rocked!

Saturday's event turned out great! As most people know Dallas was battling Hurricane Ike. Everyone was a bit concerned about the Art Walk and After Party planned for Saturday night. It started at 6 and went till 10 pm. Ike passed right to the east of us with little problem and the weather turned out perfect for the Art Walk. All the galleries looked so good and the art was fantastic. As most of you know, I am showing at Studio Fling and do the art directing on the Town Square events. Studio Fling Gallery looked great and was very busy all night. Town Square Magazine was sponsoring the VIP After Party and it was in the Green Room and Club Dada. The entire space was filled with phenomenal art, a DJ, the bar was open and the event was catered.

I reconnected with some artist friends I haven't seen in a while and met some new ones as well. Will & Teresa were there and Will Snodgrass was showing at the After Party as well. He is a fantastic water colorist. I was fortunate to meet Jorge Dominguez who does great ink drawings and was displaying as well. Considering what started out to be a questionable evening, the Art Walk and VIP After Party was spectacular.

I am writing a series of blogs this week detailing the steps in stretching your own canvas. This will save you so much money and give you the freedom to paint any size you choose. Not having to be confined to the sizes you can purchase will allow your creativity to expand! Keep your eyes peeled because it starts within the next few days! ;-) Until next time...Happy creating your colorful life.

Like this, you can Subscribe in a reader

Thursday, September 11, 2008

Back In Action!

Well I've been in blog hiding for awhile. I'm back now, fueled with Problogger tips and a new found excitement for writing. I feel much better about the whole process and am ready to get moving. Instead of just talking about my art process and shows I'm doing (which I will still do), I've decided to add some skills and lessons on stretching canvas, talking with galleries, dressing for success, marketing, etc. Basically anything I deem worthy as helpful artist advice. So look out!!

I kind of got burnt out on what to blog about, how much to blog (you see I have 2 blogs and started out everyday on both, that quickly changed and then dropped off on both), and the overall idea of it. I have since gotten a new inspiration on the whole process and am very excited about it. Since I have 2 blogs, it was very overwhelming. I decided to put HardLeatherz News on hiatus until I have this one moving along at a good pace and have more content for HardLeatherz.

From now on there will be more value for all readers, as well as continuous tidbits on myself :-D Speaking of that...I have been very busy painting pieces for the Gallery in San Diego Ca, The Liffey Art House. I am giving them 5 pieces. 1 large 4' x 5' piece and 4 smaller ones. This gallery puts me 1 step closer to moving to back to CA. Also, this Saturday is the Deep Ellum Art Walk. Along with having my work in Studio Fling Art Gallery, I am working with Town Square Magazine on an After Party and VIP Room for the event. We are setting up a Green Room of high-end art (my stuff is there ;-) too!), a band, food, and drinks. It is for all the sponsors, gallery owners, local hotel and restaurant owners, and a few select individuals from each gallery participating in the Art Walk. It looks to be a pretty big event, as long as the weather stays good (Hurricane Ike seems to want to come and play, but I told him he's not invited!).

Starting next week, I am going to start a series of blogs on the process of stretching a canvas and all it entails. Stay tuned.....Because I'm back and better than ever!

Anyone have advice on canvas stretching or what your process is, please let me know. Thanks!

Monday, July 7, 2008

Mad at Work, I tell you!

OK, I'm going to really work at this blog. With everything going on lately this has been suffering. I'm sorry! I have some great things happening... Here goes! Firstly, I was contacted by a local recording studio that wants to sponsor an art event and then wants to regularly have art related evening at his business. I am also filling a large part of the public area with art from many local arts. It is great publicity, as they are going to be having frequent interviews on TV. The art will be there as well. Next, I had a couple of meetings with Alex from Town Square Magazine and we are planning 2 more Deep Culture events, 1 art event in Expo Park, and 1 big High End Art Expo at Thanksgiving Square downtown. That is 4 art events, not counting the art show that Absolute Studios want me to do. There will be a lot of great opportunities with these shows.

I have been checking out some locals in LA for art contacts and places to live. I'm heading out there next month to look some more. I want to find similar galleries, art events, and people in LA that I have been so blessed to have found here. Anyone know any art people in LA, let me know. I would be grateful.

I almost forgot, I have mostly finished my book. Just a few more small details and I will be printing the first 2 copies of it to get a publisher. It will be so helpful to working artists. I need it now ;-) I'm going into the studio this week. I have 5 pieces I am starting and 2 more not too far behind. Busy, busy...the way I like it. As for the blog consistency, my goal is to at least blog 2-3 times a week.

I can't believe I forgot, Studio Fling is having a gallery party this Saturday July 12. It is called Planet Fling. There will be art, poetry, music, and short films. It poses to be a fantastic evening. If you are local, stop on by! CIAO

Thursday, June 26, 2008

Deep Culture Event Saturday June 28th!

Sorry for the lack of posts lately, but I've been busy getting ready for Deep Culture. All Dallas people come by and enjoy a great art and fun filled evening!! I've been hard at work getting this ready. I've been crazy gathering a wonderful selection of fantastic unique artist and am very excited about the evening. I'll be posting a slide show of the event once I figure out how that works!!
On an even bigger note, I'm doing a show at Kettle Art. We are getting together tomorrow to schedule the time. My show will run for a month and will be a collection of many new pieces. As soon as I know the dates, I will be posting them here. I am working on 5 new pieces and finishing one for this weekends Deep Culture event. Check this one out... I received an email yesterday from a gentleman from Absolute Studios wanting to sponsor and art show for me. He said he saw one of the other shows I was doing and it looks exciting. I'm so stoked! I meet with him next week to go over everything. Many new things coming up. I'll keep ya posted!! Back to painting...ciao

Monday, June 9, 2008

And so the week begins!

The gallery opening Saturday went very well. It was consistently busy all evening. The eco- friendly vendors were great. I spoke with one of the other artists, he suggested I go speak with Frank at Kettle Art. It is another gallery in Deep Ellum. The owners also own a really high end gallery on Dragon Street. I'm going to speak with Frank this week. My friends, Jesse, Jeff, and Gene came by to check it out. They ended up staying till almost closing. They left and met the at the twisted root and we went out for drinks.

Great News! The exact spot at Studio Fling opened up and I will be moving my art this week. It is a more open space with more lighting. It's great for the big art! My eco-friendly piece turned out perfect. It looks great! I'll have pics on my website soon enough!!

This week is book week. I am working on my book idea for artists. It will be a wonderful addition to any artist's tools. I'll keep you posted! Have an inspiring week. ciao

Friday, June 6, 2008

Count Down....1 Day to go!

As I have mentioned, I recently put my art up in the Studio Fling Gallery . Rob (Gallery owner) helped put up the last piece and I labeled all of the pieces so everyone knows how much they will pay for my fantastic paintings! I'm aiming for a sell out show! Tomorrow is the day for the opening. It is an opening highlighting eco-friendly art. I gotta say, it's not easy figuring that one out. I used an old canvas, so that's recycled. Then, I guess acrylic is OK, as it is water base and dissolves easily. The problem came up with the mediums I use with the paint. Not so eco-friendly, I discovered. I had to find something that mother earth was ok with or recycled. I opted for the recycled plastic shavings I got at an old tradeshow I did years ago. I pulled it out of the trash, so I believe that constitutes recycled! Sheww, that was a close one! I finished it this evening at 6:45pm. It will dry over night and be hanging on the gallery wall tomorrow night! I love the last minute thing, keeps things hopping! Remember everyone! If you live in the Dallas area, stop by the show. It goes from 7-10 Studio Fling 2924 Main St. Suite 102 Dallas, Tx 75226 Deep Ellum

Monday, June 2, 2008

All Over...For a Day

I gotta say Saturday was a fantastically busy and exciting day. I got up early, worked out and went down to Club Dada to start setting up for the Art Show that night. I had 2 great photographers, sculpturs, and many awesome painters. The artists were helpful in setting up, and everyone was back on time except me. I ended up not leaving till 6:30 from setting up. I got back around 8 and it was already busy. The turn out was great. The event was a big success. There were poetry readings, a couple of bands performing, body painting, as well as, jewelry and all the amazing art. The artists were there till after midnight and the evening continued on after. It was a wonderful evening. Next month will be better! Last Sauturday of June, check it out!

I'm off to prepare for the Gallery Opening at Studio Fling Saturday night. It is called the Fling Goes Green. It is an eco friendly show with eco friendly art on display. There is going to be eco conscious vendors and half of all proceeds are donated to a local charity. Fantastic all the way! June 7, 2008 Location Studio Fling Gallery 2924 Main St.,Ste 102 Dallas, TX 75226-Deep Ellum.

Thursday, May 29, 2008

WOW! Magazine Shoot, Gallery Set-up & Event Meeting all Today

Hello All!

I have had a crazy busy day. Town Square Magazine is doing an ongoing feature on me, my art, and art event planning over the next few issues. They want to follow me, as an artist living in downtown Dallas, over the next few months and watch my progress. It's very exciting. I feel very fortunate. This morning Matt, from the mag, came over for a quick photo shoot for the June issue and will be finishing up the interview tomorrow. There's nothing like rushing at last minute to get the energy flowing, it's very exciting! After the shoot was finished, I went to Studio Fling Gallery to get the contracts signed and started hanging my art. I was able to get the space I wanted and now have more room to hang my favorite painting, so far, Green Peace. I am displaying it this weekend and my next art event Saturday May 31, 2008, then it will go up in the gallery. It will look awesome hanging on that wall in the gallery. The last and final appointment for the day, besides helping my friend out, was a final walk through at Club Dada for the Art Event, Deep Culture, Saturday. That went really smoothly, and we headed out for a bite afterwards at the City Tavern. One last thing to do is get everything prepared for tomorrow in the studio. I will be painting all day getting some small pieces ready for the Art Show. Looking forward to a fantastic weekend and Art Show. Until next time... ciao

Sunday, May 25, 2008

Wow! What a week

Hello Everyone

This has been a crazy and busy week. First, I dropped by Studio Fling last Wednesday to show them some of my pieces and sort out the details of the contract. it was a success, I was bring my art by to hang and sign the contract on May 21 or 22. I ended up stopping by on Thursday the 22 with a few pieces and will go by Tuesday the 27th to bring the rest and sign the contract.

The show last Thursday was good. It was a nice conclusion to the loft parties. My weekend trip to visit the family for my grandmother's 90th birthday went well. Upon my return, I had a meeting with Alex from Town Square Magazine on Tuesday at Club Dada with the other directors and some of the talent about the upcoming event this coming Saturday May 31. Gene, an artist that will be in the show, and I went over everything for the show and walked back home from Deep Ellum. It was a very informative meeting. We'll have one more this week before the show. The event is called Deep Culture and it looks to be a great start to a wonderful summer. Check out Galleria Lisa for a schedule of all the Deep Culture Events and my other upcoming shows. Until next time...have a fantastic day! ciao

Tuesday, May 13, 2008

Getting Ready for Thursday's Show!

Hello

Today has been a busy day. To begin with, I started preparing for the show Thursday May 15, at the Mosaic. I decided to start bringing some of my art over to my space today. That way I wouldn't have so much to do on Thursday. I will go by Studio Fling Gallery tomorrow to talk with them about displaying my work, then finish taking the rest of my art to the Mosaic. I'll keep you posted on when I will be in the Gallery. I, also, took 2 internet marketing classes for my websites. Then, I've been updating Galleria Lisa this evening, as well. It is really looking nice. I have added most of my newer pieces and added more content. Stop by and check it out! Let me know what you think. Wow, I'm exhausted! Off to bed, for a busy day tomorrow...ciao

Monday, May 12, 2008

Today was Kind of Quiet

Hello Everyone!

Today has been a fairly laid back day. I stopped by the Mosaic Lofts Building (300 N Ackard Dallas, TX 75202) to check out the loft for my upcoming show on Thursday, May 15. It is a great space near the elevator with a nice sized balcony. My art will look great in the loft. This event is going to be a great finally. Hope to see as many of you living in the Dallas, TX area there. As for everyone else, I will be adding a little photo thing to the blog, so no one feels left out. I have spoken with some of the other artists that I am getting involved with the big Art Show at the end of the month, and everyone is very excited. As things are moving along, I will keep everyone posted through this blog. Until next time...have a fantastic day!

Friday, May 9, 2008

Meeting With Alex from the Magazine!

Hello!

I had my first meeting with Alex from Town Square Magazine about the upcoming events through out the summer. We met a local club called Club Dada. The entire club and surrounding areas in Deep Ellum. The Art/Cultural events will be the last Saturday of the next 4 months. We, then, went to 3 Art Gallery openings and I met the owners of 2. I also met and art rep at the 3rd gallery. I have a meeting with Studio Fling next week and the art rep is going to come by my show at the Mosaic next Thursday night. All in all the night was very eventful and beneficial. You never know who you are going to meet. I love that!! More info on the May 31st event later. For now, I'm busy preparing for next Thursday. If you're in Dallas...see you there!

Wednesday, May 7, 2008

Preparing for My Next Event!

Hello

Today has been a pretty laid back day. I have just been preparing for my next event. It is next Thursday night and the Mosaic in downtown Dallas. It is their big spring final floor party. The turn out is expected to be fantastic. I am meeting with Donna tomorrow to go over my space. I am very excited about it. It is including many more floors, vendors and guests than any other floor party they have put on. I am also meeting with Alex from Town Square Magazine tomorrow night at Club Dada to do a walk through for a area wide Art Show and event that the magazine is doing and I am participating it as well as doing some art direction for the entire event. I am thrilled to be apart of it. This event and many others throughout the summer is why I postponed my LA move. I am working on the website and MySpace, as well as, starting a Facebook page. Check back and I'll let you know when it's finished. Everyone, have a spectacular day! CIAO

Monday, May 5, 2008

In the Studio Today!

Hello Everyone!

I got up this morning at 6:30, rolled out of be around 6:45 and meditated, worked out and headed to the studio to work on my next piece "Saphire Snow". I worked on it for around 3 and half hours and ran out of paint supplies. I was able to finish stage 2 of the peice before running out. That worked out, as it needs to dry for a few days before I move to the third stage. I will have this piece ready for the event at the end of the month. It's quite large, and actually the largest I have done in the Snow/Crush style. It's really looking good thus far. Well, off to order paint. Until next time..... ciao

Sunday, May 4, 2008

Hello Everyone!

Well just finished the Davis Buildings Art Show last night. It was a great success. The turn out was wonderful, the band was great, and the art was amazing. Hal Samples and Jesse Cole's art, along with mine, was featured. The old KUL space looked fantastic. Well, I'm back in the studio tomorrow to work on my next spectacular art explosion. Can't wait for you to see it! Until next time, have a fantastic day.